Thursday, November 26, 2015

Restore Deleted Messages on iPhone 6/6 Plus from iTunes backup

"My son deleted his messages out of his iPhone 6 Plus. I want to know if there is any way to get any of his deleted messages back from my iTunes backup."

"I have deleted all my iPhone 6 messages by mistake. Some messages are important to me. I have backed up with my iTunes before, how can I retrieve my deleted files especially the MMS? Is there any ideas? Please help!"

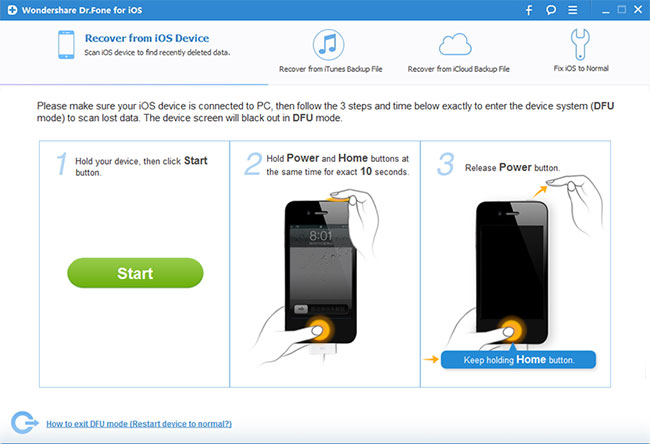
If you deleted messages from iPhone 6/6 Plus by accident and no other Apple device logged in with the same Apple ID, don't give up to recover deleted files on your iPhone. iPhone Data Recovery can help you. 


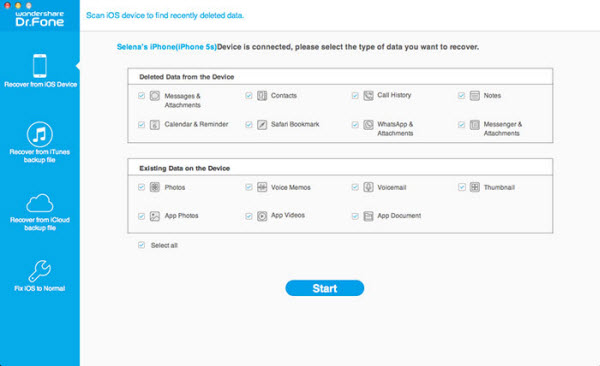
To retrieve deleted message on iPhone 6/6 Plus, we highly recommend you Wondershare Dr.Fone for iOS (Mac). It is the perfect tool for you to recover deleted and lost iPhone 6/6 Plus files including Messages, Notes, Safari, Calendar, Reminders, Voice memos, Camera Roll, Photos and so on. For windows users, read this review. The article below explains how to extract Messages (MMS/SMS/iMessages) on iPhone 6/6 Plus from iTunes backup.

Download Mac iPhone Data Recovery Software:


Recover your Messages on iPhone 6/6 Plus with iTunes backup

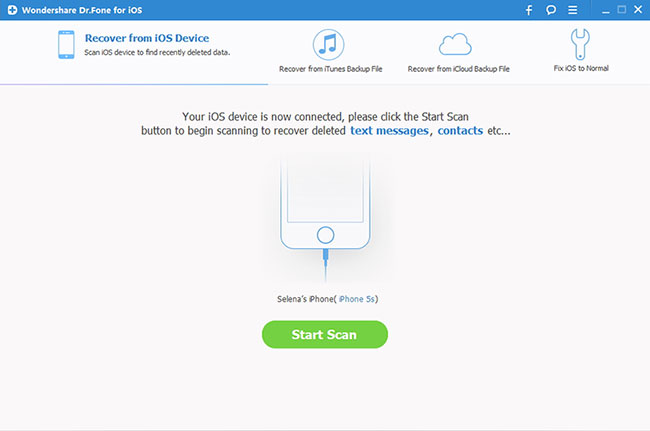
1. Run iTunes and connect your iPhone 6/6 Plus to either your Mac or PC computer with a USB cable.

2. Wait until "iPhone" tab appears within iTunes.

3. Click the "iPhone" tab and then click "Restore Backup" button in the "Backups" panel.

Tip: If you synced or backed up your iPhone with iTunes recently, you will have multiple backup files to select from. Choose backup entry you need and click "Restore".

Recover iPhone 6/6 Plus messages from iTunes Backup

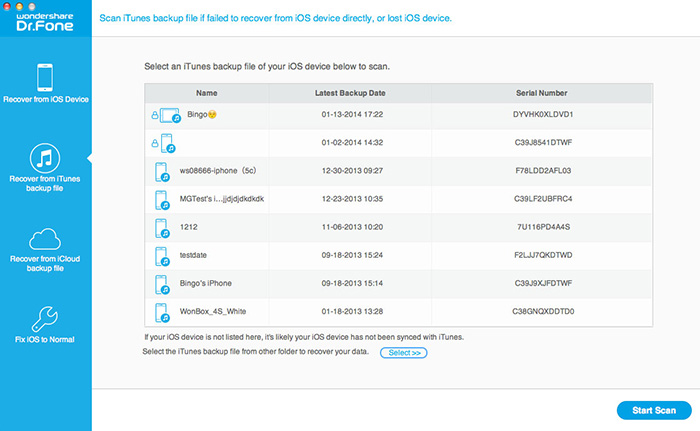
Step 1 - Select iTunes backup file to scan.

After executing the application select the "Recover from iTunes Backup File" mode.

At this mode you can see many iTunes backup file of your iDevices that was previously sync with iTunes on the computer will be automatically found and were listed. Simply select the backup you want and click 'Start Scan' to begin iTunes backup extracting.


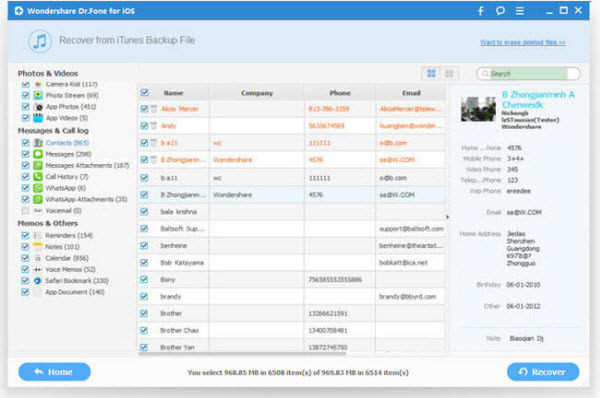
Step 2 - Preview and recover iPhone 6/6 Plus messages.

Once the scanning process finishes, all your recoverable messages backed by iTunes will be appeared in categories which you can preview one by one before recovery.

After that you can mark and recover the selective messages (MMS/SMS/iMessages) you want on iPhone 6/6 Plus or you can mark all by pressing "Recover" button at the bottom.


Buy iPhone Data Recovery Software for Mac/Win now:


Related Software:

Wondershare TunesGo (Mac): Frees your music anywhere from iPhone 6/6 Plus, doing what iTunes can’t.

Wondershare Dr.Fone for Android (Mac): A quick way to recover your lost or deleted data from Android.

Wondershare MobileTrans for Mac: One-click phone transfer tool to let you transfer data between Android, iOS, and Symbian devices. 

iFastime Video Converter Ultimate for Mac: Make all your Blu-ray, DVD collections and movie library compatible with iPhone 6/6 Plus.

Have more questions about how to recover Messages on iPhone 6/6 Plus from iTunes backup, please feel free to contact us>> or leave a message at Facebook.

More Topics:
Source: http://iphone-ipad-data-recovery.jimdo.com/2015/11/26/recover-messages-on-iphone-6-6-plus/

Tuesday, November 24, 2015

Recover lost Call History on iPhone 6 Plus due to iOS 9 upgrade

iOS 9 is cool and useful, many users like this iOS after they get used to it. However, during updating to iOS 9, some iPhone 6 Plus users had been asked me about how to recover lost Call History from iPhone 6 Plus after iOS 9 update. Call history is as important as contacts for phone users, because it record our friend and relative's phone number, if we lost contacts or call history, we can't take a phone to our friends. What a pity!


At this moment, you will need a piece of iOS 9 Data Recovery software to restore iPhone 6 Plus lost call history after upgrading to iOS 9. Here Wondershare Dr.Fone for iOS (Mac) is an all-in-one iOS 9 data recovery program you need providing three simple ways to recover lost call history, messages, contacts, photos, notes, etc. from iPhone 6 Plus due to iOS 9 update, it also supports retrieve lost data from iPhone 6S, iPhone 6, iPhone 6 Plus, iPhone 5S, iPhone 5C, iPhone 5, iPhone 4S, iPad and iPod touch on iOS 9, and fully compatible with iTunes 12.1. For windows users, read this review.

Download Mac iPhone Data Recovery Software:


Recover lost call history from iPhone 6 Plus after update to iOS 9

Step 1. Run the iPhone Call History Recovery program and connect your iPhone 6 Plus to PC

After downloading the iPhone Call History Recovery program, you need to connect your iPhone 6 Plus to Mac with USB cable. Then the primary window will come up if it detect your iPhone 6 Plus, follow its order to click "Start Scan". 


Step 2. Start to scan your iPhone 6 Plus for lost Call History

After step 1, you are allowed to start scan with iPhone Data Recovery. Wait for few minutes, the result will come out as picture below.

Step 3. Preview and Retrieve lost Call History from iPhone 6 Plus directly

All your documents is on the left of interface. Open and preview each file you may need, select and check call history you want to backup or recover. After you select what you want, click "Recover" button, then the program will begin the recovering process. When it finishes, all the data you choose are saved on your computer.

Other Two Ways for your to Recover iPhone 6 Plus Call History After iOS 9 Upgrading

Way 2: Recover data from Backup files

Step 1: Choose iTunes Backup Record to Scan


Step 2: Preview the scanning result
Step 3: Select the Target Files and Start to Recover to iPhone 6 Plus

Way 3: Scan and extract iCloud backup to recover iPhone 6 Plus data

Step 1: Choose the recovery mode and Sign in your iCloud


Step 2: Download and scan your iCloud backup


Step 3: Preview and recover whatever you want from the iCloud backup

Let's show you the guide to upgrade your iPhone 6 Plus to iOS 9

Precautions need iOS 9 Beta version before upgrading

1. Current iOS 9 only developer beta !!!! caution upgrade !!!!!

iOS 9 beta version for all devices running iOS 8, including:

iPhone 4s, iPhone 5, iPhone 5c, iPhone 5s, iPhone 6, iPhone 6 Plus

iPad 2, iPad 3, iPad 4, iPad mini, iPad air, iPad mini 2, iPad Air 2, iPad mini 3

5th generation iPod touch

2. A friend is unable to have escaped through the OTA upgrade, we recommend using iTunes upgrade.

iOS 9 Beta version to upgrade through iTunes tutorial

upgrade procedure:

1. Download the corresponding models iOS 9 Beta version of the firmware >> iOS 9 Beta version firmware download
2. The iPhone 6 Plus connected to the computer to open iTunes:
3. Hold the keyboard Shift (SHIFT key) + left mouse button click on the iTunes update \ recovery
4.iTunes will pop up a dialog box - select already downloaded the firmware - Click Update - waiting to run iTunes.
5. The successful upgrade \ After restoring iOS 9 need to activate the device to function properly! (Please prompted steps to complete)

You may had upgraded your iPhone 6 Plus to iOS 9 beta. However, no matter what devices or when your want to upgrade to iOS 9, before updating, you'd better do some backup iPhone data to computer. Because you are not one hundred percent sure that the upgrade is successful, or your operation may not be correct.

Buy iPhone Data Recovery Software for Mac/Win now:


Related Software:

Wondershare TunesGo (Mac): Frees your music anywhere from iPhone, doing what iTunes can’t.

Wondershare Dr.Fone for Android (Mac): A quick way to recover your lost or deleted data from Android .

Wondershare MobileTrans for Mac: One-click phone transfer tool to let you transfer data between Android, iOS, and Symbian devices.

iFastime Video Converter Ultimate for Mac: Make all your Blu-ray, DVD collections and movie library compatible with iPhone.

Have more questions about how to recover lost Call History on iPhone 6 Plus due to iOS 9 upgrade, please feel free to contact us>> or leave a message at Facebook.

More Topics:

Friday, November 20, 2015

Recover Lost Contacts from iPhone 5S after iOS 9 update

iOS 9 is Apple's newest operating system for iOS devices like the iPhone and the iPad, released to the public on September 16, 2015. iOS 9's biggest focus is on intelligence and proactivity, allowing iOS devices to learn user habits and act on that information, opening up apps before we need them, making recommendations on places we might like, and guiding us through our daily lives to make sure we're where we need to be at the right time. Along with these features, many iPhone 5S can't wait to update to iOS 9. 

Even if you have made full preparation for the upcoming iOS 9 upgrade, you still may lose some important contacts, and other iOS data like messages, photos after iOS update. What if you are stuck on this situation? For most of iDevices users, it will drive them crazy, especially the lost contacts mean a lot for them. 

How to get out of this terrible situation? To recover iPhone 5S lost contacts after updating to iOS 9, you can use thisWondershare Dr.Fone for iOS or Wondershare Dr.Fone for iOS (Mac), both allow you to restore iPhone 5S lost contacts after iOS 9 update. You can use this iOS Data Recovery to restore your lost files after upgrading your iPad, iPhone to iOS 9 by extracting the iTunes backup. In addition, the data recovery software can help you to recover lost text messages, photos, videos, notes, ect. from iPhone 5S. Here we'd like to share two common ways to recovery contacts from iTunes and iCloud with the help of contacts recovery software. 

Download Mac iPhone Data Recovery Software:


Recover lost contacts on iPhone 5S after updating to iOS 9 

Part I. Restore Contacts on iPhone with iTunes Backup Files 

Step 1: Download, install and launch Wondershare Dr.Fone for iOS for Mac, click on the "Recover from iTunes Backup" tab. Instantly, you will be presented with the interface requiring of selecting the backup file for your iPhone 5S.

Step 2: You will be presented with an interface of data types list from which you need to click to choose contacts to recover by clicking on the icon of Contacts.


Step 3: After scanning and previewing, recover the exported contacts to your computer. If you just want the lost items back, please check "Only display the lost items." You are also able to edit the selected items before recovering them to your Mac.


Part II. Recover lost contacts from iCloud backup 

Step 1. Install and run the iPhone data recovery tool. If you have backed up files in your iCloud account, choose Recover from iCloud Backup File.

Step 2. When you logged into iCloud, you will enter an interface asking you to choose an iCloud backup file to download. Choose the right one according to yourself.


Step 3. In the pop-up window, you can choose the type of files you would like to download from iCloud. Click on the "Next" button to begin.


Step 4. Choose contacts to recover after you finished the iCloud backup file downloading. And then preview the exported contacts items and choose whatever you want to transfer to your computer.

You’re done. If you lost your iPhone 5S data like call history, notes, messages, photos, MMS, and voice memos caused by iOS update or any other reasons, just get Wondershare Dr.Fone for iOS(Mac) to recover your data easily and quickly.

Buy iPhone Data Recovery Software for Mac/Win now:


Related Software:

Wondershare TunesGo (Mac): Frees your music anywhere from iPhone 5S, doing what iTunes can’t.

Wondershare Dr.Fone for Android (Mac): A quick way to recover your lost or deleted data from Android .

Wondershare MobileTrans for Mac: One-click phone transfer tool to let you transfer data between Android, iOS, and Symbian devices. 

iFastime Video Converter Ultimate for Mac: Make all your Blu-ray, DVD collections and movie library compatible with iPhone 5S.

Have more questions about how to recover lost iPhone 5S contacts after updating to iOS 9, please feel free to contact us>>or leave a message at Facebook.

More Topics:

Wednesday, November 18, 2015

How to recover data from water damaged iPhone?

It's a sad fact that iPhones get damaged all the time, especially when you drop your iPhone in the bath, the sea or the toilet carelessly. Some problems may result after water datamaged:

1. Failure of the existing system - but the equipment is not abnormal, then you can re-brush firmware and then restore the backup of it.
2. Screen Shade - may be water for the adverse effects of the screen, in some cases may improve over time, in some cases the screen will leave little trace.
3. Connect the computer has a reaction, but not power, DFU restore invalid. This time can detect whether a battery problem, can not boot the first choice is to replace the battery, a lot of the water situation, no problem after replacing the battery, and the battery is not expensive.
4. Can be turned on, but the rest of the failure of various buttons, speakers, headphones failure, touch screen insensitive, failures, etc. In these cases, the need for further maintenance and replacement of related accessories.
5. Worst-case scenario: Can not drive after changing the battery, the motherboard burned, we need to replace the motherboard. As we all konw, motherboard is the most expensive part in all of the components. To replace the mainboard, or change a new iPhone, suit yourself.

If you are eager to get the data from the water damaged iPhone, we can use a third-party to do that. Here, we recommend the Dr.Fone for iOS or Dr.Fone for iOS Mac. If you have ever synced with iTunes before and have an iTunes Backup, you can extract the backup file. If you don't have a backup on iTunes, it doesn't matter. You still can directly scan your iPhone and recover data directly from it, as long as you can get into the device's scanning mode. Here is the detailed tutorial on recovering data from water damaged iPhone. Read this review to learn more.

tips: You'd better backup iPhone data to iTunes, iCloud, in case that your iPhone lose or ge back to factory settings.

Download iPhone Data Recovery Software:


How to Recover Data from Water Damaged iPhone?

Step 1. Launch the water damaged recovery software and connect your iPhone with PC

Launch Wondershare Dr.Fone for iOS on your computer. There are two recovery modes for you: Recover from iOS Device & Recover from iTunes Backup File. Choose the first one and connect your water damaged iPhone to the computer. 

Step 2. Scan your water damaged iPhone

Now you can scan your iPhone according to the interface you've get in the step above. For iPhone 6S Plus /6S/6/6 Plus/5S/5C/5/4S users, you can directly click "Start Scan" button to scan data on your damaged iPhone.


For iPhone 4/3GS, you need to follow the way below to enter the device's scanning mode to scan it: Hold your iPhone and click "Start" button, then immediately press "Power" and "Home" buttons for exactly 10 seconds. When 10 seconds passed, release "Power" button and keep holding "Home" button for another 15 seconds until you're told to release it.


Step 3. Preview & recover data from water damaged iPhone

When the scan completes, all of the found data will be listed in categories like Camera Roll, Photo Stream, Contacts, Messages, Call History, Calendar, Notes, Reminders, Voice Memos and Safari Bookmark. You can preview each of them before recovery. Mark those you want and click "Recover" at the bottom to save them all on your computer with one click.


Note: Data found here includes what you have on your iPhone now and those you deleted before. You can slide the button on the top of the interface above to only display the deleted items.
Plus, if your water damaged iPhone can’t turn on and enter the scan mode, you can easily recover data from iTunes backup, you can try it by yourself.

Buy iPhone Data Recovery Software for Win/Mac now:


Related Software:

Wondershare TunesGo: Frees your music anywhere from iPhone, doing what iTunes can’t.

Wondershare Dr.Fone for Android: A quick way to recover your lost or deleted data from Android .

Wondershare MobileTrans: One-click phone transfer tool to let you transfer data between Android, iOS, and Symbian devices. 

iFastime Video Converter Ultimate: Make all your Blu-ray, DVD collections and movie library compatible with iPhone.

Have more questions about how to save a water damaged iPhone, please feel free to contact us>> or leave a message atFacebook.

More Topics:

Wednesday, November 4, 2015

Best way to Find iPhone Backup Location on Windows & Mac

As a fancier of Apple's iPhone devices, you may have confusion about where to find iPhone backup. Normally, each time when you sync iPhone with iTunes, iTunes will automatically generate a backup, or you can automatically backup your iPhone at anytime by right-clicking the iPhone in iTunes under Devices and choosing Back Up.  Here we list top 5 questions you ask about the location of iPhone backup files. Check them out and find answers.


1. Where is the iPhone Backup File Location on Mac and in Windows?

By default, iTunes will place the backup files to the following path. Check it out.

iTunes backup location on Windows XP: \Documents and Settings\(username)\Application Data\Apple Computer\MobileSync\Backup\
iTunes backup location on Windows Vista/Windows 7/8/10: \Users\(username)\AppData\Roaming\Apple Computer\MobileSync\Backup\
iTunes backup location on Mac (Yosemite/Mavericks): ~/Library/Application Support/MobileSync/Backup/


Note 1: The Application Data/AppData is a hidden folder in Windows. So you must turn on “Show hidden files and folders” option in Windows to see that folder.

Note 2: The “~” represents your home directory of Mac OS. If you don’t see Library in your Home folder, hold Option and click the Go menu.

2. How to Delete iTunes Backup & Change iTunes Backup Location?

Option 1: Delete iTunes Backup

1. Open iTunes Preferences. For Windows users, choose Edit > Preferences; for Mac users, choose iTunes > Preferences.

2. Click Devices and select the backup your want to remove. Then click Delete Backup to delete the selected backup.


Option 2: Change iTunes Backup Location

Apple does not provide a direct way of changing location where the contents of iDevices are backed up. Here we’ll share quick ways for Windows/Mac users to easily move their backup for iTunes to another disk.

For Windows Users:

1. Ensure that iTunes is closed and navigate to the folder where your iPhone backups are.
2. Move the backup folder from C: Drive to the new desired destination via a simple drag and drop.
3. From the Start Menu, type cmd.exe. Open the Command Prompt, right-click it and choose Run as Administrator.
4. From the Command Prompt, type mklink /J “%APPDATA%\Apple Computer\MobileSync\Backup” “the new location of the backup folder”.
5. Press Enter and wait for Windows to create a symbolic link to the new folder from the old one.


For Mac Users:

1. Make sure that iTunes isn’t running. Move your iTunes backup folder ~/Library/Application Support/MobileSync/Backup/ to the location of your choice.
2. Launch Terminal Applications/Utilities/Terminal on your operating system.
3. Once launched, type the following command line: ln -s /Volumes/DriveName/Backup/ ~/Library/Application Support/MobileSync/Backup (the DriveName would be the name of the new backup location).


Question 3. What is Stored in iPhone Backup

iTunes will backup camera roll (images), safari bookmarks, mail accounts,  call history, network settings, voice memos, Auto fill information for webpages, messages, app settings, keyboard shortcuts, game center account, In-app purchases and wallpapers. So its really important to backup your iPhone data using iTunes.
Note: Any videos greater than 2GB are not backed up.

Question 4. What are the files named in iPhone Backup File Location?

The filenames of iPhone in iTunes are encoded, here are what they are:


Question 5. How to Find and View Files from iPhone Backup?

Want to restore your iPhone, but unfortunately find the backup file have been deleted by mistake? Don’t worry. You can use an iPhone Data Recovery to recover deleted files from iPhone 6S/6S Plus/6/6 Plus/6S/6S Plus directly.

Wondershare Dr.Fone for iOS is an iPhone backup extractor to help you quickly and easily find your iPhone backup data. It can automatically detect, find and list all your iPhone backup files without opening iTunes or connecting your iPhone to computer. And you don't need to take the trouble to remember the backup locations. Such a convenience! Now download and install it on your Windows PC. Mac users go to Wondershare Dr.Fone for iOS (Mac) and you will know how to find to iPhone backup files on MacBook Pro, iMac, MacBook Air, Mac Pro.

Free Download iPhone Data Recovery Software:


Learn how to Recover iPhone Data without iTunes backup here.

With all the questions clear, you can better handle what you want to deal with iPhone backup file. Users have several reasons to find location of iPhone backup; but it is advisable to trust iTunes to take care of all your iPhone backup. This knowledge of finding location of your iPhone backup comes to your help when you want to Jailbreak your device.
Related Software:

Wondershare TunesGo: Frees your music anywhere from iPhone, doing what iTunes can’t.

Wondershare Dr.Fone for Android: A quick way to recover your lost or deleted data from Android .

Wondershare MobileTrans: One-click phone transfer tool to let you transfer data between Android, iOS, and Symbian devices. 

iFastime Video Converter Ultimate: Make all your Blu-ray, DVD collections and movie library compatible with iPhone.

Buy iPhone Data Recovery Software for Win/Mac now:


Have more questions about how to view iPhone Backup Files on PC/Mac, please feel free to contact us>> or leave a message at Facebook.

More Topics:

Monday, November 2, 2015

Backup iPhone, iPad, iPod Touch before iOS 9.0.2 installing

Apple’s iOS 9.0.2 update is avaliable and it’s a small upgrade that tackles some big problems. ... Now would be a good time to back up your iOS devices on a regular basis before upgrading which will save you a lot of headaches if your phone fails or gets lost in the future. There are many ways to back up and restore files on an iOS device, we will cover just the basics 6 ones.


1. Backing up with iCloud

An item of note before I explain the backup process: Apple has changed their iCloud storage tiers over time. You can see the current plans here, or by going to Settings → iCloud → Storage → Change Storage Plan.

For the US, the current plans and pricing are:
  • 5 GB — Free (same as ever)
  • 50 GB — $1/month
  • 200 GB — $3/month
  • 1 TB — $10/month
While I do wish 50 GB was the free plan, Apple has matched Dropbox on the 1 TB option and lowered the pricing elsewhere. 50 GB will cover the vast majority of people’s backup needs.

With that said, here’s how to back your data up to iCloud. First, let’s determine what you want to include in (or exclude from) the backup. To do that, navigate to Settings → iCloud → Storage → Manage Storage → Choose your device under ‘Backups’.

Under Backup Options you will see a list of toggles for the photo library and every app on your device, sorted by file size:


Everything will be toggled on by default, so turn off any items you’d rather not back up. If you’ve upgraded to one of the new storage tiers listed above and space is no concern, then we recommend leaving everything on.

Once you’ve determined what to back up, make sure the device is on a Wi-Fi network and, for best results, connected to a power source (this process can take a while). Now, navigate back to Settings → iCloud → Backup and ensure iCloud Backup is toggled on. If it is, you’ll see a Back Up Now option. Just tap that button and wait for the process to complete.

Also note that iCloud backups can happen automatically at night. Assuming your iOS device is plugged in and charging and is also connected to a Wi-Fi network, it will automatically back up to iCloud. If you’ve been running the iOS 9 betas on your iPhone/iPad/iPod, be sure that it has a current backup before setting up. Some versions of the public beta had issues making iCloud backups.

Issues with backing up iOS Device data via iCloud

1. iCloud doesn’t work if you use iPhone under iOS 6 or iOS 5;
2. iCloud can’t restore parts of data selectively.
3. You are allowed to get 5 GB of free iCloud storage. And you can’t backup to iCould if you don’t have enough space

2. Backing up with iTunes

An iTunes backup is a great option if: (a) you need more space than the free/paid tier of iCloud storage you have allows; or (b) you want an extra layer of backup in addition to your iCloud backup.

The process is simple:
  • Plug your device into your Mac or PC.
  • Open iTunes and select the iDevices icon in the upper-left corner.
  • Click the Summary tab and scroll down to the Backups section.
  • Click the Back Up Now button and wait for the backup to complete.
  • To verify that the backup worked, open iTunes Preferences and select the Devices tab. If the backup was successful, you’ll see it listed there.
It’s not as slow as iCloud, but can still take a while if you’re not in the habit of regularly backing up your device. If you don’t keep local copies of your applications stored in iTunes, you’ll want to transfer purchases before trying to restore to a new phone. You can do from File → Devices → Transfer Purchases. Once your new phone is restored and all your apps have been reloaded, you can delete the apps off your Mac to save space.

Issues with backing up iOS Device data via iTunes:

1. iTunes may ask you to sync or upgrade your iOS and wipe all the contents.
2. iTunes can’t selectively backup data, it will takes you a few hours each time the iPhone backs up since doing an image backup.

3. Backing up with MobileTrans

Run and Install MobileTrans on your computer, and connect your old idevices and new one to it via 2 USB cables > Select the content you want to backup > Start Copy. In the pop-up dialog, you can see the transfer progress. When it’s finished, the data on your old data will be transferred to your new iPad/iPhone/iPad.

4. External Hard Drive

The iTunes library is a database iTunes uses to organize your music and movies. The best way to back up your iTunes library is to consolidate your library into one folder and then copy that folder to an external hard drive. Here are official steps on how to backup iTunes library to external hard drive.

5. Sync iPhone/iPad/iPod Data to Google

To backup iOS data without iTunes, you can choose to sync iPhone/iPad/iPod Mail, Calendar, and Contacts to Google. Here is a step-by-step guide to set up Google Sync with your iOS device.


Note: Google Sync is only supported on Apple iOS versions 3.0 and above

6. Using a Third-party iOS Backup Software

Not only being taken as an iOS Data RecoveryWondershare Dr.Fone for iOS (Mac) can also flexibly and selectively backup files from iOS devices to computer. With it, you can scan files like photos, contacts, SMS, voice memos, reminders, call history, SMS attachments, Safari bookmarks and more saved on your iPhone, and you are allowed to preview all files and select which are important to save on your computer. Windows users can refer to this review.

Tips: Highly recommend iOS backup before:
  • Accidently deleted files.
  • Restored to Factory settings without backup.
  • Lost iPhone/iPad/iPod data due to jailbreak or iOS update.
  • iDevices were inaccessible when it is stuck in Apple logo screen, locked with passcode.
  • iOS devices was lost, broken, wet or stolen.
  • Getting a new iPhone/iPod/iPad.
  • Sync with iTunes.
This iOS data recovery works when you lost iPhone data due to above reasons. Download, install and launch this iOS Backup and Data Recovery software.


Related Software:

Wondershare TunesGo (Mac): Frees your music anywhere from iPhone/iPad/iPod, doing what iTunes can’t.

Wondershare Dr.Fone for Android (Mac): A quick way to recover your lost or deleted data from Android.

Wondershare MobileTrans for Mac: One-click phone transfer tool to let you transfer data between Android, iOS, and Symbian devices. 

iFastime Video Converter Ultimate for Mac: Make all your Blu-ray, DVD collections and movie library compatible with iOS devices.

Have more questions about how to backup your iPhone, iPad, iPod on Windows and Mac, please feel free to contact us>> or leave a message at Facebook.

More Topics:
Source: http://mac-ios-data-recovery.jigsy.com/entries/general/backup-iphone-ipad-iphone-data